In this tutorial, we are going to Add Subscriber Box in GeneratePress without plugin. Basically, here we are going to embed a form to collect email, and later we can use those emails to send newsletters or various offers.
We will use MailChimp embedded forms in our GeneratePress Theme form just below the content.
Also, we are going to learn more about
- Why use MailChimp form?
- Embedded form in GeneratePress and GenerateBlocks
- Uses of Elements Module and Hook in GP Theme
- And Many More…
Why use MailChimp?
From a few years, I am using MailChimp to collect subscribers and send a newsletter using RSS feed. The reason to use MailChimp is that we can start for free. You can collect up to 2000 subscribers for free and you need to upgrade your account after 2000 contacts.
Basically, 2000 is a big number so signup your account in MailChimp. The other thing about MailChimp is that you can send 10,000 emails per month with a daily limit of 2,000. Isn’t it impressive?
Moreover, you can create various signup forms in MailChimp. You can use Form builder, Embedded forms, Subscriber pop-up, Form integrations, etc. In this tutorial, we are going to use Embedded Forms only.
Also Read: GeneratePress Review
Steps to Add Subscriber Box in GeneratePress without plugin
1. MailChimp Embedded Form Code
As we are using MailChimp so first we are going to use embedded form code on our website.
1.) Go to MailChimp and signin/signup your account.
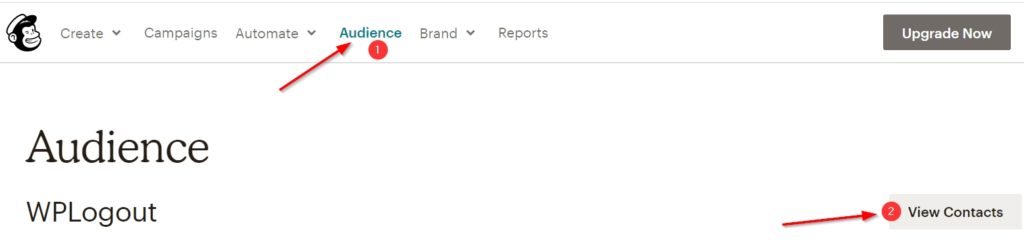
2.) Go to Audience > Click on View Contacts
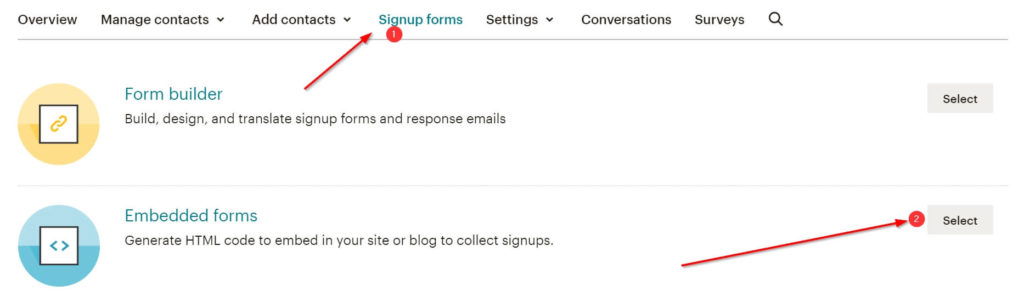
3.) Now Go to Signup Forms and Select Embedded Forms.
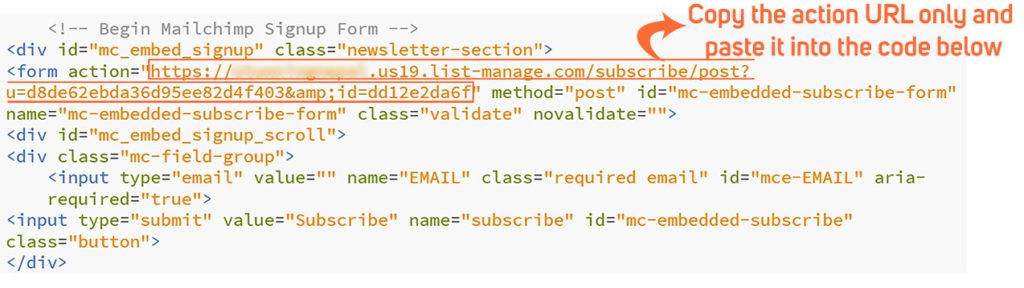
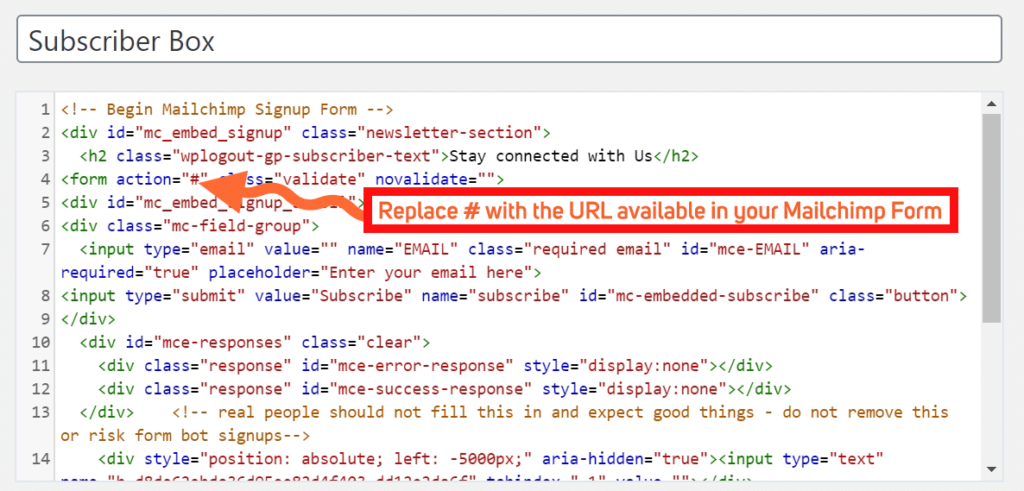
Now, you can see the embedded code generated by MailChimp. You don’t have to copy the whole code here since you will get the code down below.
Here, you just need to copy the action URL generated by MailChimp and Paste below in the code.
2. Adding Subscriber Box code using Element Module
1.) First Go to Appearance > Elements > Add New > Select Element Type as Hook > Add Title.
2.) Copy and paste into the following Subscriber code in Hook Box.
Here we will collect email only therefore we are using an email input field only, you can customize the code and collect Name, Email, Address, Phone Number, etc.
Furthermore, Mailchimp use JavaScript to validate your email so, we need to use mc-validate.js in the below code.
<div id="mc_embed_signup" class="newsletter-section">
	<h2 class="wplogout-gp-subscriber-text">Stay Connected with us</h2>
<form action="#" method="post" id="mc-embedded-subscribe-form" name="mc-embedded-subscribe-form" class="validate" novalidate="">
<div id="mc_embed_signup_scroll">
<div class="mc-field-group">
	<input type="email" value="" name="EMAIL" class="required email" id="mce-EMAIL" aria-required="true" placeholder="Enter your email here">
<input type="submit" value="Subscribe" name="subscribe" id="mc-embedded-subscribe" class="button">
</div>
	<div id="mce-responses" class="clear">
		<div class="response" id="mce-error-response" style="display:none"></div>
		<div class="response" id="mce-success-response" style="display:none"></div>
	</div>    <!-- real people should not fill this in and expect good things - do not remove this or risk form bot signups-->
    <div style="position: absolute; left: -5000px;" aria-hidden="true"><input type="text" name="b_d8de62ebda36d95ee82d4f403_dd12e2da6f" tabindex="-1" value=""></div>
    </div>
</form>
</div>
<script type="text/javascript" src="//s3.amazonaws.com/downloads.mailchimp.com/js/mc-validate.js"></script><script type="text/javascript">(function($) {window.fnames = new Array(); window.ftypes = new Array();fnames[0]='EMAIL';ftypes[0]='email';fnames[1]='FNAME';ftypes[1]='text';fnames[2]='LNAME';ftypes[2]='text';fnames[3]='ADDRESS';ftypes[3]='address';fnames[4]='PHONE';ftypes[4]='phone';fnames[5]='BIRTHDAY';ftypes[5]='birthday';}(jQuery));var $mcj = jQuery.noConflict(true);</script>
3.) Now go to the Hook Settings and Choose Hook Location as after_content.
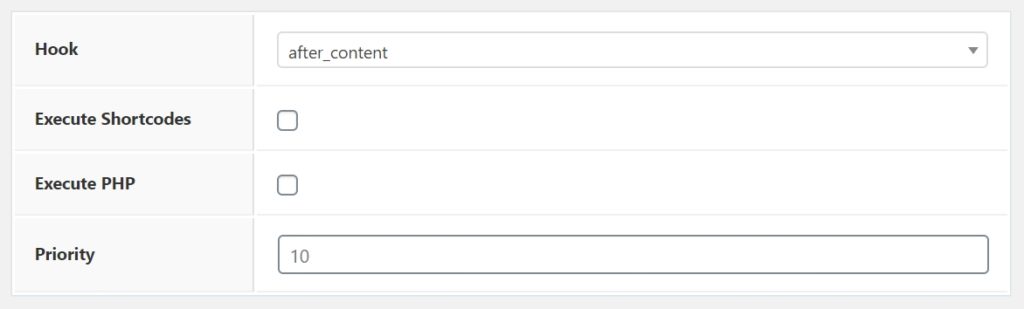
4.) Now Go to Display Rules and Choose Location as Post, All Posts.

5.) Hit Publish Button.
3. Styling GP Subscriber Box using CSS
- Go to your Appearance > Customize.
- Go to Additional CSS.
- Copy and Paste the below Subscriber CSS code.
- Hit Publish Button.
Note: You can change the subscriber button color from the colors module in Customizer. First, you need to Activate the colors module in GeneratePress if you haven’t already.
Go to Appearance > GeneratePress > Colors > Activate.
Furthermore, Go to Appearance > Customizer > Colors > Buttons.
Play with colors and change it that matches your brand.
.wplogout-gp-subscriber-text {
    text-align: center;
    padding: 20px 0 10px 0;
    color: #fff;
    font-weight: 700;
}

.newsletter-section {
    background: #3d3f42;
    height: 200px;
    margin: 20px 0;
    border-radius: 10px;
}

.newsletter-section #mc_embed_signup {
    text-align: center;
}

.mc-field-group {
    display: flex;
    flex-wrap: wrap;
    justify-content: center;
}

@media (min-width: 768px) {
    .mc-field-group {
        padding: 0px 150px 20px 150px;
    }
}

@media (max-width: 768px) {
    .mc-field-group {
        padding: 20px 0;
    }
}

.newsletter-section input[type="email"] {
    padding: 15px 30px;
    font-size: 20px;
    border-top-right-radius: 0;
    border-bottom-right-radius: 0;
    border-right-width: 0;
}

.newsletter-section input[type="submit"] {
    padding: 15px 30px;
    border-top-left-radius: 0;
    border-bottom-left-radius: 0;
}

@media (max-width: 768px) {
    .mc-field-group {
        flex-direction: column;
        width: 100%;
    }
}

@media (max-width: 768px) {
    .newsletter-section input[type="email"] {
        border-top-right-radius: 4px;
        border-bottom-right-radius: 4px;
        border-right-width: 1px;
    }
}

@media (max-width: 768px) {
    .mc-field-group input[type="email"] {
        margin-bottom: 5px;
    }
}

@media (max-width: 768px) {
    .newsletter-section input[type="submit"] {
        border-top-left-radius: 4px;
        border-bottom-left-radius: 4px;
    }
}

#mce-success-response {
    text-align: center;
}
4. Result
The subscriber box in GeneratePress Theme looks like this which is added just below the content.

Also Read: Create Subscription Box in Generateblocks
Wrapping Up
At last, I think now you can Add Subscriber Box in GeneratePress without plugin. This is the simplest solution you can find in WordPress to embed the form on your blog.
As the free or paid subscriber plugin has more features but by using this method, you are using one less plugin on your website.
Moreover, customize your GeneratePress theme using the latest GeneratePress Tutorials and also learn optimization techniques and implement it in your WordPress website.
Finally, feel free to tweak the CSS code that matches your brand, and don’t forget to comment below if you have further problems.
Thank you so much sirji, for the post!
Can you write a post about- How to create a divider between the posts in GeneratePress?
Hi Jiwan, Can you share some screenshots?
Thanks
hello, Suraj sir! sir css not working exactly! please shaye css style like your blog! please sir please 💕💕💕
Hi Akash, Which part of CSS is not working? Please adjust CSS according to your requirement. I am using a paid plugin on my blog.
Thanks
hello suraj,
i have follow your tutorial above but subscriber look like this prnt.sc/szzg6d not showing as your showing picture above with black border with colorful color subscribe button,
border only showing white please tell
Hi Fawad, I have tested the code for you and it’s working fine at my end. Please follow the tutorial again.
For the Subscriber button color, you need to Go to Appearance > Customizer > Colors > Buttons and play with some colors.
Thanks
how can i make it like yours!
Hi Viney, I am using a paid plugin. Thanks
which plugin are you using?
Hello Suraj! I am a regular visitor of your blog and asked various questions in comment section but never received a single answer. If you did not answered today will never visit you blog again.
I am sharing this screenshot prnt.sc/vb9xdh . I want to show same newsletter box in my sidebar. I am using generatepress theme.
Waiting for your answer.
Thanks
Hi Muhammad,
I haven’t got your comment on this blog before.
So as in Screenshot, you can achieve the same look by using the WP Subscribe Pro plugin.
Thanks
How do I create this section of your website “GET 100+ FREE SEO TOOLS”?
Hi Biswajit, it’s simple, I create a list post by aligning the image to the right and embedding the newsletter using shortcodes at last.
Thanks
I wonder if you are still active. Do you know any way to add the subscriber box in sidebar?
Hi Sumit,
Go to widget and use Generateblocks and follow similar process.
Thanks