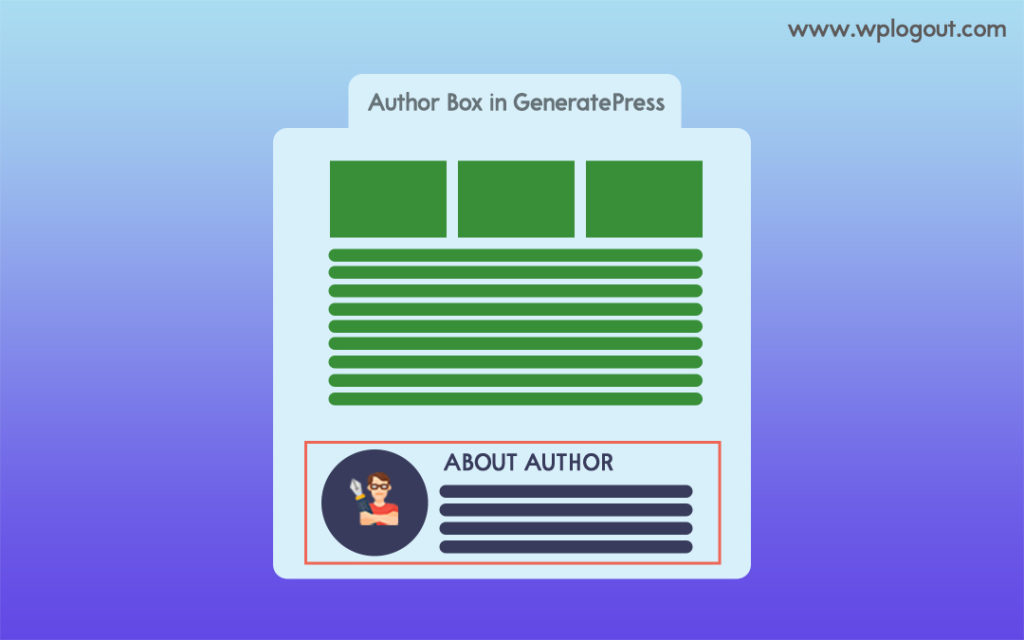
In this blog post, we are going to add Author Box in GeneratePress Theme. Learn how to implement author box info using a plugin or without a plugin on a WordPress website.
In this article, you will also learn
- Why do you need an Author Box on your website?
- Add an Author Box in Free GeneratePress Theme.
- Implement Author Box using a Plugin.
- Show Author Bio with Gravatar.
- Add an Author Box Info in GeneratePress Premium Theme without a plugin.
Moreover, Tom Usborne – The Founder and Lead Developer of GeneratePress Theme thinks the Author Bio Box is more of a content part rather than a theme part. By default, there is no author box in GeneratePress Theme.
Therefore, you need to add the author info box by yourself in your GeneratePress free or Premium Theme.
Why You Need Author Box on your Website?
The main reason why you need an author box on your website is due to E-A-T signals.
E-A-T stands for Expertise, Authoritativeness, and Trustworthiness. E-A-T is a Search Quality Guideline that are used by Google to improve its algorithm.

Since Author Bio is not a ranking factor but adding a biography on the posts page helps Google to determine the expertise of the writer and why the Author should be trusted.
So adding an Author Bio on your website helps to increase Google’s Search Quality Guidelines signals. Therefore, you need to add it on GeneratePress Theme too using a plugin method or without a plugin method.
Also, read more about E-A-T and Quality Raters’ Guidelines explained in Whiteboard Friday by Marie Haynes on the Moz website.
Moreover, the Author Bio helps readers to know about the person behind the content/website. It helps to increase the credibility of your blog since having a bio make your site authentic.
Before Adding Author Box in WordPress
Before the author bio appears on the WordPress site, you need to know about Gravatar and Biographical Info.
Gravatar
Gravatar is a Globally Recognized Avatar. It is a part of WordPress which is maintained and supported by Automattic.
Using the Gravatar site you can create your profile by just signing up and uploading the photos. And Gravatar can be enabled on any WordPress site automatically.
How to Enable Gravatar in WordPress?
First, you need to create an account on the Gravatar website in order to complete your profile.
- Go to your WordPress Dashboard.
- Visit the Users Menu.
- Edit your User Profile.
- Go to the About Yourself section > Profile Picture.
- Now Click on You can change your profile picture on Gravatar.
- You will be redirected to the Gravatar website.
- Sign in/Signup using WordPress.com credentials.
- Authorize your WordPress account with Gravatar.
- Now go to Add a New Image section.
- Upload your picture.
- Rate your Gravatar between G, PG, R, and X.
- You’re done with the Gravatar profile.
- Go back to the About Yourself Section and you will be able to see your Profile Picture.
- Also, don’t forget to Add ALT Text to Gravatar Images in GeneratePress for SEO purposes.
The profile picture appears while commenting on WordPress sites, Author Bio, and WordPress forums. This one picture works for all your profiles.
Biographical Info
After working on Gravatar in the About Yourself section, you need to write the Author Bio. It will appear on your site along with your profile picture. You can also link up your Social Media Profile using Anchor Tag in the Biography Section.
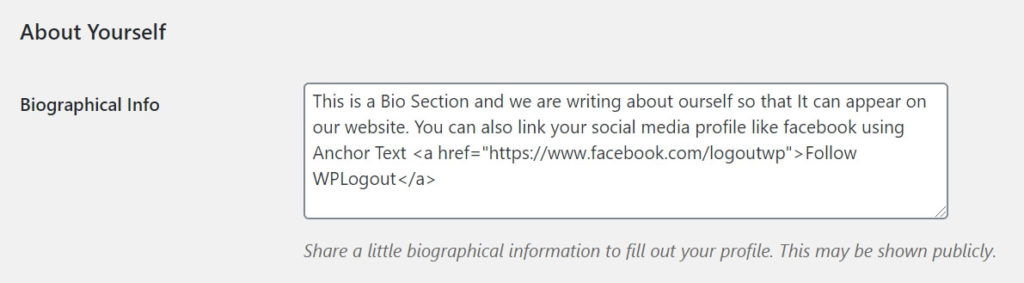
In certain case, both Gravatar and Bio is used by WordPress website. In some cases, the Author Bio Plugin helps to implement both Avatar and Author info.
How to Add Author Box in Free GeneratePress Theme?
For Free GeneratePress Version, you need to use the plugin in order to get the Author Box below the single post.
There are several Author Box plugins available on the WordPress repository but we are listing a few of them. Some of the listed plugins are recommended in the GeneratePress Support forum
1. Fancier Author Box

Fancier Author Box by ThematoSoup is a great plugin to look after if you are interested in integrating Author Bio into every post on your website.
The plugin has active installations of over 10,000 with 4.8 average ratings out of 5 stars. But the bad thing about this plugin is, it hasn’t been updated over the last 5 years. So be aware of compatibility issues.
2. Simple Author Box

Simple Author Box is another best plugin to try on your website. As stated in the name, the plugin is simple to implement, and where you can get the best out of the plugin. I have tried this plugin on my friend’s site and I am quite happy with this plugin.
Moreover, the plugin is responsive and fully customizable in order to match your theme design. Also, you can add up to 30 social media profiles to your Author Bio Box.
3. Social Pug: Author Box

Social Pug is another plugin to look after that helps to add a simple responsive Author Box below posts and pages. Though the plugin has active installations of over 800+ only you can give it a try in your blog.
The sad thing about Social Pug: Author Box plugin is that it hasn’t get updated for the last 4 years. So, don’t forget to test with the latest WordPress version and your theme itself.
4. Starbox – the Author Box for Humans

While GeneratePress Premium clients are asking about Author Box, the customer support team recommends the Starbox Author plugin. So, you can try the Starbox plugin in GeneratePress Theme.
Starbox plugin supports Google Microformats vCard, customization of the author info for each Author, Social Media Profiles link for each Author, using your own Avatar than using Gravatar, etc.
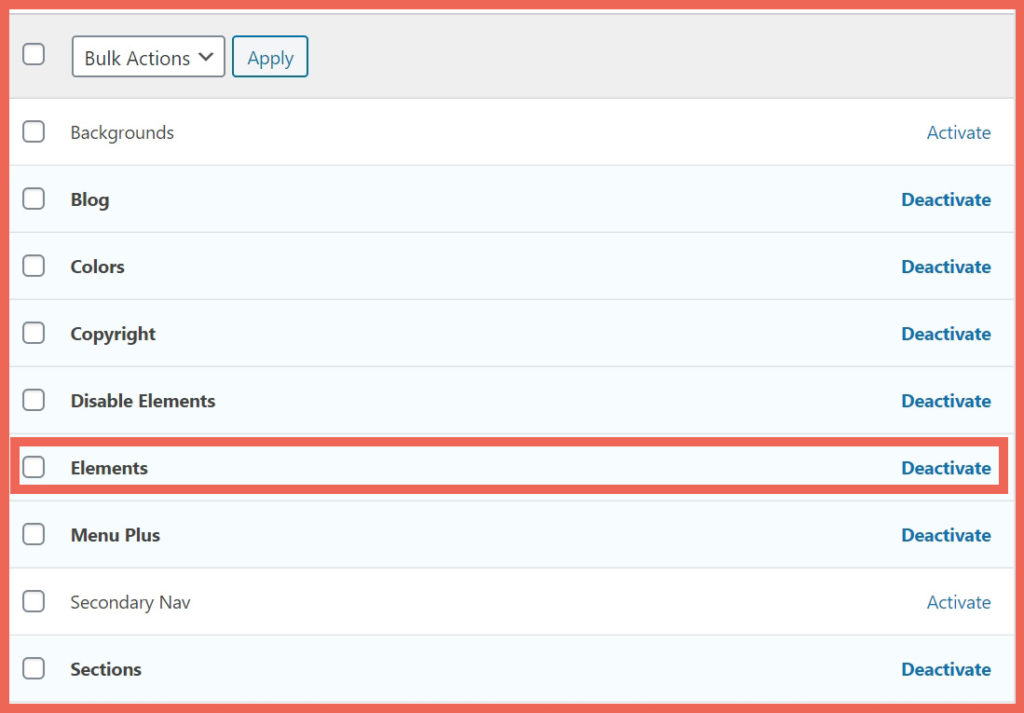
Furthermore, If you want to avoid the use of the above-listed plugins then you need to activate the Element Module to use Hook. But the Element module is only available on the Premium version. So, to get the author box without the plugin follow the below method.
How to Add Author Box in GeneratePress Premium Theme?
To add an author box info in the Premium Version of GP Theme, we are using the Hook Method i.e. without the use of the Author Box plugin. You need to do the following things.
- Activate the Element Module.
- Add New Elements. Go to Appearance > Elements > Add New Hook.
- Use the below PHP Code to add an Author Box in GeneratePress Theme.
- Go to Appearance > Customize > Additional CSS.
- Add the following CSS Code to Style the Author Box.
1. Activate the Element Module
We need to add a Hook in GeneratePress in order to achieve the Author Info Box on our website. so, let’s activate the Element Module
Go to Appearance > GeneratePress > Elements > Activate
2. Add New Element Hook
Let’s add New Hook in Element. Go to Appearance > Elements > Add New Element
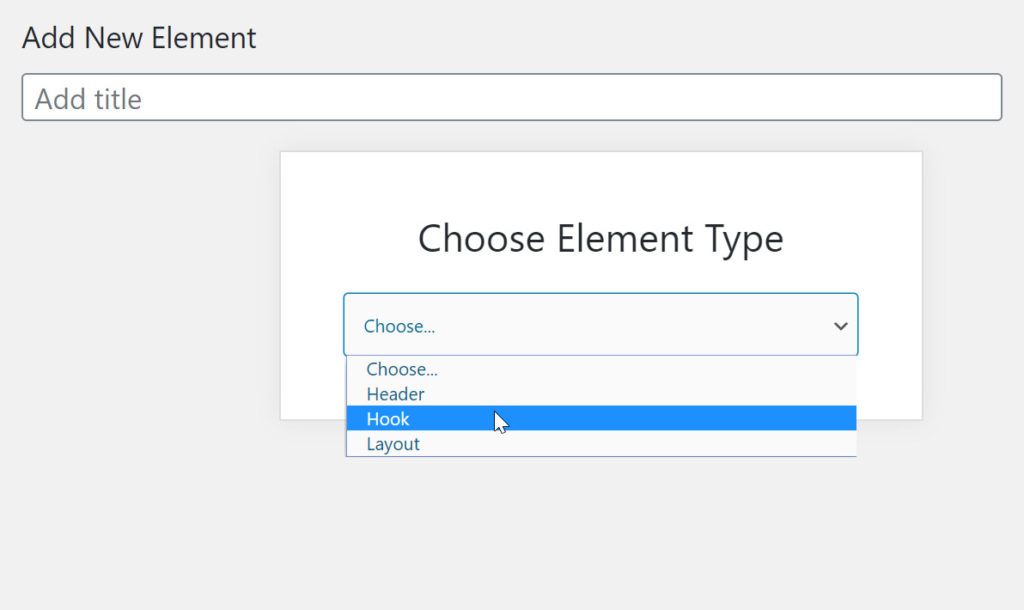
Choose the Element Type as Hook. Give the Hook New Title as Author Box.
Copy and Paste the following Code
Here I am posting two different codes, use only one of them.
Code I:
<div class="author-box">
	<div class="avatar"><?php echo get_avatar( get_the_author_meta( 'ID' )); ?></div>

        <h5 class="author-title"><?php printf( esc_attr__( 'About %s', 'the author' ), get_the_author_meta( 'display_name') );?></h5>

	<div class="author-summary">

        <p class="author-description"><?php echo wp_kses( get_the_author_meta( 'description' ), null ); ?></p>

        <div class="author-links">

        <a href="<?php echo get_author_posts_url( get_the_author_meta( 'ID' ) ); ?>" title="Read more">...</a>

        </div>

    </div>

</div>
Code II
<div class="author-box">
<div class="avatar">
<?php echo get_avatar( get_the_author_meta( 'ID' ), 250 ); ?>
</div>
<div class="author-info">
<h5 class="author-title" itemprop="author" itemscope itemtype="http://schema.org/Person">
<span itemprop="name"><?php printf( get_the_author_meta( 'display_name') );?></span>
</h5>
<div class="author-summary">
<p class="author-description"><?php echo wp_kses( get_the_author_meta( 'description' ), null ); ?></p></div>
<div class="author-links">
<a href="<?php echo get_author_posts_url( get_the_author_meta( 'ID' ) ); ?>" title="Read more">...</a>
</div>
</div>
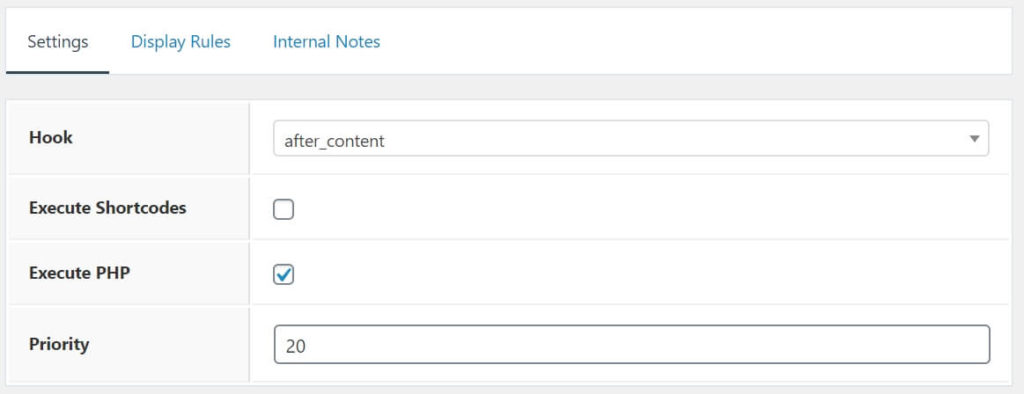
</div>Go to Hook Settings and choose Hook to show after_content. Check the Execute PHP box. Assign the Priority to 20.
Again, Go to Display Rules and Choose the Location to display in Post > All Posts.

And Finally, Hit the Publish button.
3. Use CSS to Style the Author Box
Style the Author Box with CSS Code. You can change or tweak this code as necessary for your blog. The CSS code works both for desktop, tablet, and mobile devices.
CSS for Code I
.author-box {
    display: -webkit-box;
    display: -ms-flexbox;
    display: flex;
    -ms-flex-wrap: wrap;
    flex-wrap: wrap;
    padding: 4%;
    margin-top: 30px;
    font-size: 1em;
    box-shadow: 0 9px 28px rgba(0,0,0,0.30), 0 15px 12px rgba(0,0,0,0.22);
}

.author-links a {
    font-size: 3em;
    line-height: 0.5em;
    float: right;
}

.author-box .avatar {
    width: 30px;
    border-radius: 100%;
    margin-right: 20px;
}

.author-title {
   font-weight: 700;
}

h4.author-title {
    margin-bottom: 0.5em;
}

.author-description {
	margin-bottom: 10px;
}

/* For Mobile Devices */
@media (max-width: 768px) {
    .author-box {
        flex-direction: column;
        text-align: center;
	padding: 50px 10px;
    }

    .author-box .avatar {
        margin-right: 0;
        margin-bottom: 10px;
        width: 100%;
	margin-top: -35px;
    }

    .author-box .avatar img {
        max-width: 70px;
    }
}
CSS for Code II
.author-box {
	padding: 3%;
	padding-bottom: 10px;
	margin-top: 30px;
	font-size: 0.9em;
	background-color: #fff;
	display: -webkit-box;
	display: -ms-flexbox;
	display: flex;
	-webkit-box-align: center;
	-ms-flex-align: center;
	align-items: center;
        box-shadow: 0 9px 28px rgba(0,0,0,0.30), 0 15px 12px rgba(0,0,0,0.22);
}
.author-box .avatar {
	width: 250px;
	height: auto;
	border-radius: 100%;
	margin-right: 30px;
}
h5.author-title {
	margin-bottom: 0.1em;
	font-weight: 600;
}
.author-description {
	line-height: 1.6em
}
.author-links a {
	margin-top: -1.5em;
	font-size: 2em;
	line-height: 2em;
	float: left;
}
@media (max-width: 768px) {
	.author-box {
		padding: 20px;
		padding-bottom: 25px;
		margin-top: 60px;
		flex-direction: column;
		text-align: center;
	}
	.author-box .avatar {
		margin-right: 0;
		width: 100%;
		margin-top: -25px;
	}
	.author-box .avatar img {
		max-width: 100px;
	}
	.author-links a {
		float: none;
		align-self: center;
	}
	.author-description {
		margin-bottom: -0.1em;
	}
}
I am using this method in my WPLogout blog and various other sites to add an author box.
Also Read: GeneratePress Review
Summary
At last, I would like to thank the GeneratePress Support forum, especially Tom Usborne and David for the necessary code. I have tweaked some code here in order to add Author Box in GeneratePress Theme.
By the above methods, you can add the author box in the free and premium versions of the GeneratePress Theme. For free users, you need to install an author box plugin.
If you use a premium version then I suggest going without a plugin ( Hook Method) to add the author info box. You can change/tweak the code as necessary.
If you have any comments or additional changes then please feel free to drop them below.
Hey! Suraj,
This article is really helpful for me. Would you please provide the CSS code which you use in your single post to create a shadow on the image?
Hello Sayan,
Thank you for the comment.
I am using block editor so here is the CSS Code.
.single .wp-block-image img {
	border-radius: 5px;
        box-shadow: 0 0 15px 5px rgba(0,0,0,.1);
}
Enjoy!!!
Thanks, Suraj.
🙂
Hey Suraj .
I learnt from you lots off thing. Thank you so much for sharing awesome GeneratePress Tips and Tutorial.
Welcome, Buddy! 🙂
Hey Suraj,
That’s amazing. Can you share your author box CSS? it’s looking Dope.
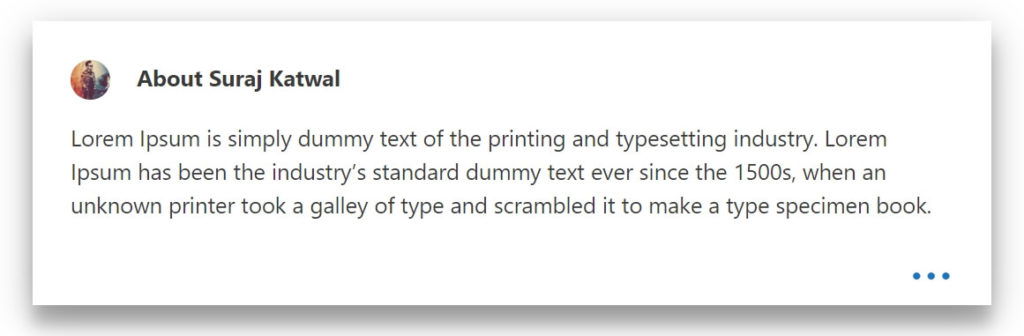
Also after adding Author box element a three-dot showing. How I can remove that.
Hi Jim, Are you referring to the drop shadow CSS code?
You can remove Author Box three-dot by removing
author-linkscode in the last lineYes drop shadow CSS code, the image is showing the left side and author bio showing in the middle as like your author box CSS code.
Can You able to share here?
Hi Jim, here is drop shadow for author box
It’s working. Another problem, Author description & Author Name now showing like yours.
Can your drop that CSS code?
You can inspect the code from your browser using ctrl + shift + I. Copy and use it.
Thank you.
Hey, Suraj.
Great work buddy, I really enjoyed your tutorials on GeneratePress. I implemented above steps and I got the box as shown in tutorial but I see three dots that takes me to author profile. ( see screenshot: upload.picpaste.me/image/eHbO2) Can you help me with that?
By the way, can you make a tutorial on designing breadcrumbs same as yours?
Thank you
You can remove Author Box three-dot by removing
author-linksdiv in the last line.Also, you can check my breadcrumbs tutorials
Hi Suraj, great guide!
1) How would I go about linking the author’s name to their author page and removing the three dots?
2) How would I add social profiles and a website if filled in their user profile (ideally using icons and not text).
3) How would I add a line break in the author bio so it’s not one big block of text? I tried but that didn’t seem to work.
Thanks!
author-linksdiv in the last line of the above codeGreat This Trick is Awesome 🙂 This article helped me lot. Thanks for sharing Suraj.
👍
Sir please also tell that how you have animated read more button.please provide the CSS and php code
Hi Kuldeep, Soon I may create a tutorial on this.
Thanks
Update: please check this link to customize read more button in GeneratePress Theme
Thank you for this guide. I tried the similar steps earlier from one more website, but it did not work as expected.
Your steps looked simple and straightforward. But still, the author bio is coming down the image not like in your this blog post (Your author box). I need the content right side of the image like you are showing here. Can you help me to get like your way?
Hi Stefan, Can you email me your site so that I can help you.
Thanks
hello suraj
I have also same problem as mentioned above Stefan, not like your’s author displaying seem different unappropriate,
how can i set it..
Hi Fawad, I have updated the code, please check it again.
Thank You.
Hi Suraj,
I followed your tutorial and it works. But how can I put the text right beside the logo? I know how to resize the logo, but if I make the logo larger, the text/description would only be pushed down.
How can I make it float left or put the text right beside the logo?
Not sure what’s he proper term for it though.
Hi Jeff, Thank You for the comment. I have mentioned two methods in the tutorials. So, I think you need to play with CSS code to fulfill your requirements. I will look at it if I can do anything.
Thanks
Hi Suraj
I finally figured what was the problem!
I used the Code 1, and I tried to apply the CSS code II.
No wonder it wasn’t working correctly! haha
Thanks!
Cheers Mate 😀
Hello there,
Sorry but the 2 codes is not working with me.
Any idea?
Hi Carlos, can you please explain in detail?
If you are using Code II then copy the CSS for Code II.
That’s it.
Thanks
Hey Suraj, Tried each and every step exactly as mentioned. But it somehow changes the layout. The Leave comment heading moves to sidebar and the widgets move down below the post comment button
Hi Aditya, I have tested the code in the localhost again and it’s working perfectly fine.
There are 2 Hook codes i.e. Code I and Code II and CSS for Code I and Code II.
Did you mix Code I Hook and Code II CSS?
Did you forget to select Execute PHP?
I think you forget something. Please try again watching the video too.
Thanks
I followed all the steps exactly not one but 2 times over an interval of 15 days. Might be an error from my server side. I remember not mixing up hook and CSS.
Hi Aditya, Can you email me at wplogout[@]gmail[.]com?
Thank You
Hi Suraj.
Why the author archive url shows username instead of display name or nickname? Is there any solution?
Have a look at this solution ==> Remove URL from Author Name in GeneratePress Theme
Nice post brother, I have been surfing online more than 3 hours today, yet I never found any interesting article like yours. It is pretty worth enough for me. In my view, if all web owners and bloggers made good content as you did, the internet will be much more useful than ever before.
There is certainly a lot to know about this issue.
I love all of the points you’ve made. I am sure this post
has touched all the internet viewers, its really really good post on building up new weblog.
I recently switched from Newspaper to GP and your tutorials have been a godsend, man. They’re incredibly helpful and insightful (and well-written, obviously). Keep doing what you’re doing!
Hi Amulya,
I am happy that you find my tutorials good. Indeed you make a great choice by migrating to the fastest WordPress Theme: GeneratePress
If you need more help then always feel free to comment.
Thanks
how to add read more button from author card to author page?
I am pleased with the design of your author box, however removing author-links div in the last line of the code did not remove the three dots from the Author Box. Any suggestions?
Hi Michelle,
I am using the same code and I have removed the whole DIV from the last line and it’s working fine.
Can you please recheck it?
Please let me know after doing this.
Thanks
Hello Suraj,
Here is what I have:
.author-box {
padding: 3%;
padding-bottom: 2px;
margin-top: 30px;
font-size: 0.9em;
background-color: #fff;
display: -webkit-box;
display: -ms-flexbox;
display: flex;
-webkit-box-align: center;
-ms-flex-align: center;
align-items: center;
box-shadow: 0 9px 28px rgba(0,0,0,0.30), 0 15px 12px rgba(0,0,0,0.22);
}
.author-box .avatar {
width: 160px;
height: auto;
border-radius: 100%;
margin-right: 30px; padding-bottom: 8px
}
h5.author-title {
margin-bottom: 0.1em;
margin-top: -40px;
font-weight: 600;
}
.author-description {
line-height: 1.6em
}
@media (max-width: 768px) {
.author-box {
padding: 20px;
padding-bottom: 25px;
margin-top: 60px;
flex-direction: column;
text-align: center;
}
.author-box .avatar {
margin-right: 0;
width: 100%;
margin-top: -25px
}
.author-box .avatar img {
max-width: 100px
}
.author-description {
margin-bottom: -0.1em;
}
}
Hi
There is code I and Code II with separate CSS for both codes. Please kindly copy the CSS code from above tutorial
Thanks
That did the trick. Thank you
The author box looks great on the desktop and tablet, but on the mobile view, my name and picture move outside of the box. (Half of the photo is located outside of the top of the box and the lower half of the photo is below the top of the box.) My photo is in the middle of my name, obscuring it. The horizontal mobile view is fine. The vertical mobile profile is the problem.
Hi Michelle, you can manage that with CSS code. The code itself is in the CSS part.
Try changing it.
Thanks
I don’t know CSS…
Hey Suraj!! I love your blog. Especially the generatepress information.
Can you plz write an article on one other generatepress’s issue/customization?
By default the generatepress show the name of the category on category page. Is it possible to show the yoast seo title instead of the default category name?
Cannot there be a code that automaticaly grab the yoast seo title for the archive page.
Plz reply. I am waiting.
Hi Muhammad,
You can do that if you have already installed Yoast Plugin.
Go to your category and edit your meta title description there.
It will get reflected in SERPs.
Thanks
Hello Suraj. I have been trying to troubleshoot an issue with the author box since late November, but still have not been successful. What CSS would fix the author name and picture being outside of the box on vertical mobile view? Any help you can provide is appreciated.
The horizontal mobile view is fine. The vertical mobile profile is the problem.
hi suraj, i have an issue with hook element. when ever i creat a hook, it shows “Oops! That Page Can’t Be Found.”
Hi Niroj,
Did you fix the problem?
Hello Suraj,
THANKS a lot for your tutorial !
I was wondering if you could tell me how display “latest posts” like Starbox or Fancier author do ?
Also how to display social links as well ?
Thanks a lot !!
Cheers,
Sam
Hello, I want to add “About” before the author’s name in code II. Is it possible?
Hi A.R,
You can just look at some code from I to add “About” in code II.
Please try it. If you can’t then I will look after it.
Thanks
Hello Sir
I used This Code All Complete Copy and Paste But
Not Working Css On Web View but Mobile View Completely View
Hi Vasiyani,
Please follow the step again, I am using the same code in my website too.
Also, check if you are using Code I and CSS code II or Code II and CSS Code I, don’t mix it.
Thanks
Can I add a social profile link with a social icon inside the author box??
Hi Sanjoy, Yes you can, use Generateblocks and Elements module to design the author box.
Thanks
Thanks Suraj very useful
Hello Suraj,
I am using your custom Author box but one thing I have noticed that it is missing alt attributes of the author image. Please help me add alt text to the author image in this author box.
Hey Suraj,
The article helped me but I have a doubt.
Can you please tell me how can I add this author box to specific pages of my website WebShieldz
Hi Faraz,
I think you have already implemented it.
Thanks
can you convert your code into the code snippet?
Hi ert,
Which code are you searching for?
Hi Suraj, Loved this article.
But I am in some trouble, on my website I’ve different authors and I want to show their bios on articles written by them. How can I do it? can you plz help? it would be very helpful for me.
Hi Arshad,
You can assign a User in each author’s bio under Display Rules settings.
Please check it.
Thanks
Very Helpful Content bro. Keep it up
I find your blog by searching in google.
Hello sir
i add this one .avatar
border: 4px solid #f1f1f1;
i have now two image
please how to solve it
If I replace the three dots icon (…) with ‘More Articles’ text in the element, the text size becomes big. How to inline the text size?
Hi Suraj,
This is so helpful, thank you! QQ – how do I change the code so that my ‘Name’ shows and not my ‘username’?
Thank you,
Bella
Hi Bella,
I think you have to visit your profile and add your First and Last Name.
Dashboard > Users > All Users > Edit your Profile.
Thanks
Hii Suraj,
This is really good Thank You! But can you tell me how do i add my social profile icons like facebook and LinkedIn with clickable link. It would be great if you give me code and step to apply.
Thank You!
Aryan
Hi Aryan,
It’s easy as WordPress has inbuilt Social Media Blocks.
Search for Social Icons block and add it.
Thanks
I used your code II to create author box, how do i make changes in code to get social icons with customizable link. I really don’t know much about code and stuff or should.
And I think making author box with generate blocks will not give me that css effect like your. (background shadow and bulging out effect)
Hi Aryan,
You can use Pro version of Generateblocks or use Custom CSS for shadows and other effects.
Thanks
Thanks for your tutorials.
Hello, How to add social links in author box ?
Hi Manav,
Use Generateblocks to create author box.
Thanks