In this tutorial, we will be creating a simple carousel slider in Bulma. First, let’s create a basic HTML structure. We will need a section element, and inside that, we will put our slides.
Creating a simple carousel Slider in Bulma CSS is really easy. All you need is some basic HTML and CSS knowledge with extra JS.
The goal to create this carousel slider tutorial is just to simply copy-paste the code so that you don’t have to waste your time searching for the slider.
In this guide, you can learn about
- Bulma CSS Framework
- Bulma Carousel
- Styling Slider with Caption
- Adding Bulma Carousel Extension
- So On…
Steps to create a simple slider in Bulma CSS
Before getting started, here we are going to use basic Bulma HTML, CSS code, Bulma Carousel Extension, JavaScript, etc.
Let’s link our external stylesheet file, Bulma CDN Link, and Bulma Carousel CSS CDN link in the head section.

<link rel="stylesheet" href="style.css">
<link rel="stylesheet" href="https://cdn.jsdelivr.net/npm/bulma@0.9.4/css/bulma.min.css"><link rel="stylesheet" href="https://cdn.jsdelivr.net/npm/bulma-carousel@4.0.4/dist/css/bulma-carousel.min.css" />Before the body end, let’s link the external script JS file, Bulma Carousel JS CDN Link, and custom JS script.
<script src="script.js"></script><script src="https://cdn.jsdelivr.net/npm/bulma-carousel@4.0.3/dist/js/bulma-carousel.min.js"></script><script>
bulmaCarousel.attach('#slider', {
slidesToScroll: 1,
slidesToShow: 1,
infinite: true,
autoplay: true,
});
</script>1. Create a Bulma Section
Now, let’s move to our body area and add a section tag as it defines a section in a document. It is an optional part but when you want to style this section part then it will become easier.
<section>
<YOUR CODE WILL BE HERE>
</section>2. Add a parent div element with an ID attribute
Now, let’s start our parent div with the ID attribute. Let’s make our ID name unique as a #slider. We will insert JS later on this ID attribute.
<section>
<div id="slider">
<YOUR CODE WILL BE HERE>
</div
</section>3. Add a Bulma Card inside the parent div
Now, it’s time to add Bulma Card Components inside our parent div. Let’s add a card CSS class within the div. You can learn about Bulma Card here.
<section>
<div id="slider">
<div class="card">
<YOUR CODE WILL BE HERE>
</div>
</div
</section>4. Add a Bulma Card Image and Card Content Inside Card
Now, it’s time to add an Image and Caption for the slider, caption part is an optional part. However, for this tutorial, we are going to add using Bulma card-image and card-content classes.
Duplicate at least 3 to 4 card div with different HD images.
<div class="card">
<div class="card-image">
<figure class="image is-16by9 is-covered">
<img src="YOUR-IMAGE-HERE.JPG" alt="" />
</figure>
</div>
<div class="card-content slider-text">
<div class="is-size-5 box">
<YOUR_IMAGE_CAPTION_HERE>
</div>
</div>
</div>5. Wrap a parent div
Now, it’s time to wrap a parent div with a section tag.
<section>
<div id="slider">
<div class="card">
<div class="card-image">
<figure class="image is-16by9 is-covered">
<img src="YOUR-IMAGE-HERE.JPG" alt="" />
</figure>
</div>
<div class="card-content slider-text">
<div class="is-size-5 box">
<YOUR_IMAGE_CAPTION_HERE>
</div>
</div>
</div>
</div>
</section>6. Link style.css
As above, we have already linked our stylesheet named style.css in the head section. If you have a different name then do it accordingly. Here is the CSS code to style our simple carousel slider in Bulma. Also, link all the necessary CSS mentioned above.
.slider-text {
position: absolute;
right: 0;
bottom: 0
}
#slider .card-content{
max-width: 50%;
}
#slider{
overflow: hidden;
}
@media screen and (max-width: 1023px) {
#slider .card-content{
display: none;
}
}
.prev,
.next {
cursor: pointer;
position: absolute;
top: 50%;
width: auto;
padding: 16px;
margin-top: -50px;
color: white;
font-weight: bold;
font-size: 20px;
transition: 0.6s ease;
border-radius: 0 3px 3px 0;
user-select: none;
-webkit-user-select: none;
}
.next {
right: 0;
border-radius: 3px 0 0 3px;
}
.numbertext {
color: #f2f2f2;
font-size: 12px;
padding: 8px 12px;
position: absolute;
right: 0;
top: 0;
}
.item-slide img {
max-width: 1200px;
}
.caption-container {
color: white;
}7. Link script.js
As above, we have already linked our script file named script.js in the footer section. If you have a different name then do it accordingly. Here is the JS code to make our slider functional. Also, link all the necessary JS files mentioned above.
var slideIndex = 1;
showSlides(slideIndex);
function plusSlides(n) {
showSlides(slideIndex += n);
}
function currentSlide(n) {
showSlides(slideIndex = n);
}
function showSlides(n) {
var i;
var slides = document.getElementsByClassName("item-slide");
var captionText = document.getElementById("caption");
if (n > slides.length) {slideIndex = 1}
if (n < 1) {slideIndex = slides.length}
for (i = 0; i < slides.length; i++) {
slides[i].style.display = "none";
}
}8. Initialize Slider Script
Before the body end, let’s initialize the slide using the following code.
<script>
        bulmaCarousel.attach('#slider', {
            slidesToScroll: 1,
            slidesToShow: 1,
            infinite: true,
            autoplay: true,
        });
</script>9. Full Code Simple Carousel Slider in Bulma
index.html
<!DOCTYPE html>
<html lang="en">
<head>
<meta charset="UTF-8">
<meta http-equiv="X-UA-Compatible" content="IE=edge">
<meta name="viewport" content="width=device-width, initial-scale=1.0">
<title>Bulma Slider</title>
<link rel="stylesheet" href="style.css">
<link rel="stylesheet" href="https://cdn.jsdelivr.net/npm/bulma@0.9.4/css/bulma.min.css">
<link rel="stylesheet" href="https://cdn.jsdelivr.net/npm/bulma-carousel@4.0.4/dist/css/bulma-carousel.min.css" />
</head>
<body>
<section>
<div id="slider">
<div class="card">
<div class="card-image">
<figure class="image is-16by9 is-covered">
<img src="https://source.unsplash.com/random/1200x500" alt="" />
</figure>
</div>
<div class="card-content slider-text ">
<div class="is-size-5 box">
Lorem ipsum dolor sit amet, consectetur adipisicing elit. Accusantium cum blanditiis dolore
aperiam reiciendis minima doloremque recusandae atque illum. Dolorum impedit aut facere,
porro minus quia dignissimos minima. Iure, magni?
</div>
</div>
</div>
<div class="card ">
<div class="card-image">
<figure class="image is-16by9 is-covered">
<img src="https://source.unsplash.com/random/1200x500" alt="" />
</figure>
</div>
<div class="card-content slider-text ">
<p class="is-size-5 box">
Lorem ipsum dolor sit amet consectetur adipisicing elit. Itaque facere inventore voluptate
ad, ipsam, esse asperiores distinctio ipsum reprehenderit nostrum veniam debitis perferendis
vero repellat earum commodi quaerat qui excepturi.
</p>
</div>
</div>
<div class="card ">
<div class="card-image">
<p class="image is-16by9 is-covered">
<img src="https://source.unsplash.com/random/1300x500" alt="" />
</p>
</div>
<div class="card-content slider-text ">
<p class=" is-size-5 box">
Lorem ipsum dolor sit amet consectetur, adipisicing elit. Ipsam magni sint exercitationem
libero nesciunt quo saepe, voluptates eaque. Iure itaque quam facere sit praesentium minus
deserunt tenetur nemo assumenda asperiores?
</p>
</div>
</div>
</div>
</section>
<script src="script.js"></script>
<script src="https://cdn.jsdelivr.net/npm/bulma-carousel@4.0.3/dist/js/bulma-carousel.min.js"></script>
<script>
bulmaCarousel.attach('#slider', {
slidesToScroll: 1,
slidesToShow: 1,
infinite: true,
autoplay: true,
});
</script>
</body>
</html>style.css
.slider-text {
    position: absolute;
    right: 0;
    bottom: 0
  }

#slider .card-content{
    max-width: 50%;
  }

#slider{
    overflow: hidden;
  }

@media screen and (max-width: 1023px) {
    #slider .card-content{
      display: none;
    }
  }

.prev,
.next {
  cursor: pointer;
  position: absolute;
  top: 50%;
  width: auto;
  padding: 16px;
  margin-top: -50px;
  color: white;
  font-weight: bold;
  font-size: 20px;
  transition: 0.6s ease;
  border-radius: 0 3px 3px 0;
  user-select: none;
  -webkit-user-select: none;
}

.next {
  right: 0;
  border-radius: 3px 0 0 3px;
}


.numbertext {
  color: #f2f2f2;
  font-size: 12px;
  padding: 8px 12px;
  position: absolute;
  right: 0;
  top: 0;
}

.item-slide img {
  max-width: 1200px;
}

.caption-container {
  color: white;
}script.js
var slideIndex = 1;
showSlides(slideIndex);

function plusSlides(n) {
  showSlides(slideIndex += n);
}

function currentSlide(n) {
  showSlides(slideIndex = n);
}

function showSlides(n) {
  var i;
  var slides = document.getElementsByClassName("item-slide");
  var captionText = document.getElementById("caption");
  if (n > slides.length) {slideIndex = 1}
  if (n < 1) {slideIndex = slides.length}
  for (i = 0; i < slides.length; i++) {
      slides[i].style.display = "none";
  }
}How To: Integrate Bulma (CSS Framework) in WordPress
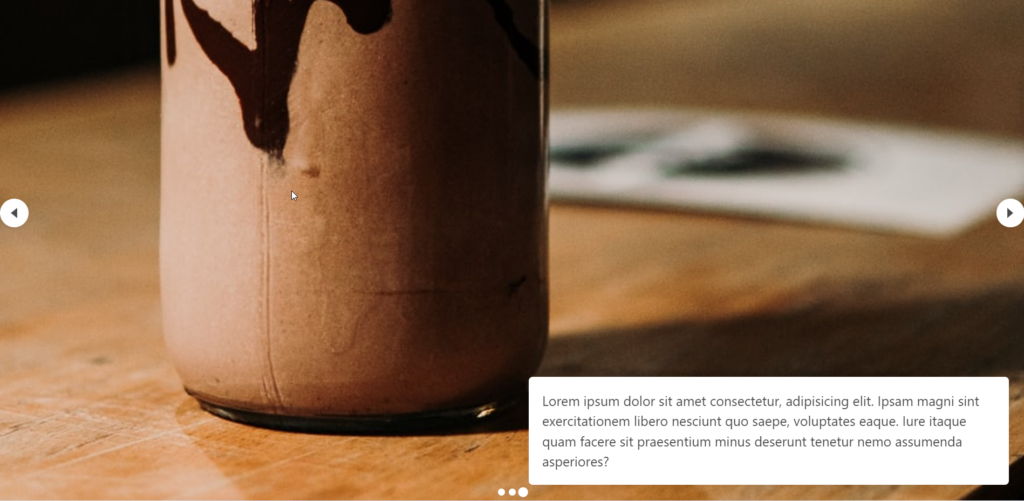
10. Result
Here is the sample result for the Bulma carousel slider.
Conclusion
At last, you can edit the above-mentioned stylesheet, and JS file as your need. I was working on one of the projects and I was searching for the slider and hence this is what I implemented in my project.
I hope after reading this guide, you will be able to implement the code and create a simple carousel slider in Bulma.
If you have any query, please leave a comment below.
It helped me a lot!! Thank you
please keep posting such tutorials!!
Thank you, this just worked for my website.